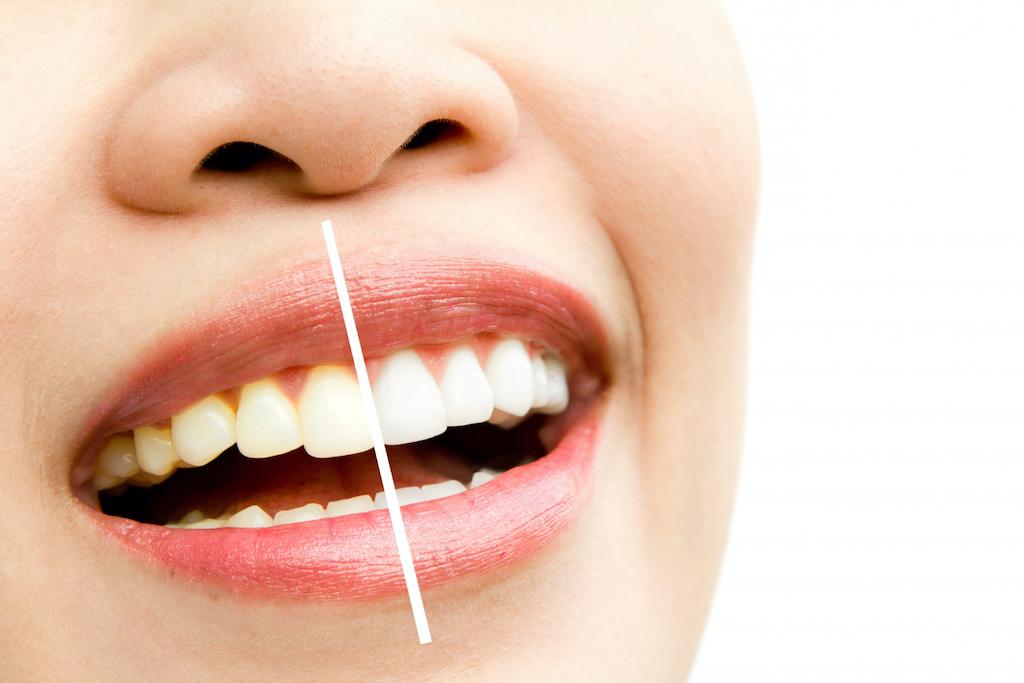
Here’s a secret many dentists haven’t fully tapped into: before-and-after photos can significantly increase treatment acceptance. They help turn hesitant patients into confident ones simply by showing what’s possible.
When patients see real dental transformations, they don’t just notice straighter teeth or whiter smiles; they start imagining their own outcomes. A well-crafted smile gallery or single makeover story can build belief in the comfort, confidence, and quality of life they’ve been hoping for.
Below are five practical ways to use before-and-after photos to reassure patients, strengthen trust, and encourage them to move forward with treatment.
1. Build a Smile Gallery on Your Website
One of the easiest and most effective ways to showcase your work is by building a Smile Gallery on your website. Unlike a static brochure or generic list of services, a gallery filled with before-and-after photos lets potential patients see real, relatable results, often more compelling than any written description.
But photos alone aren’t always enough. That’s why we recommend pairing them with Smile Gallery Stories: short, informative summaries that add context and emotion to each transformation.
Here’s how to make your gallery even more effective:
- Include a variety of procedures like veneers, whitening, bonding, implants, or full smile makeovers so patients can find examples that reflect their own needs.
- Organize photos by treatment type or dental concern, such as discoloration, gaps, crowding, or chipped teeth, to help people easily find what they’re looking for.
- Add short story captions that follow this simple formula:
- Why did the patient come in? (e.g., “Patient felt self-conscious about deep staining from years of coffee.”)
- What was the solution? (e.g., “We completed in-office whitening and added bonding to reshape a front tooth.”)
- What was the outcome? (e.g., “She left with a brighter, more confident smile for her upcoming graduation photos.”)
These small but powerful summaries help visitors imagine their own transformation and reassure them that your team has seen and solved problems just like theirs.
Pro tip: Make sure your gallery is mobile-friendly. Most patients will browse from their phone, so a smooth experience here can make a lasting first impression.
2. Use Before-and-Afters During Consultations
Consultations can feel overwhelming, especially when patients don’t know what to expect. Showing them before-and-after photos of past patients with similar challenges can make these conversations feel more grounded and reassuring.
Use photos to:
- Set realistic expectations for results and timelines
- Reduce surprises or uncertainty around outcomes
- Encourage more informed questions and discussion
Seeing someone else’s journey demystifies the process. When patients recognize themselves in someone else’s “before,” they become more open to envisioning their own “after.”
3. Share Transformations on Social Media (the Right Way)
Platforms like Instagram and Facebook are perfect for showing smile transformations in a quick, scrollable format. You don’t need to overdo it. Just keep things friendly, real, and results-focused.
Here’s how to keep posts engaging and professional:
- Use consistent themes like #TransformationTuesday or “Smile of the Month”
- Keep captions simple and benefit-driven, focusing on confidence, comfort, or functionality
- Use polls, questions, or stickers to boost interaction
- Always, always get patient consent
HIPAA-compliance tip:
Use secure consent methods, such as:
- Adding a photo release section to your treatment forms
- Providing a one-page explanation form for patients to sign
- Using a digital tool to gather signatures pre- or post-treatment
With the right systems in place, social media can become a reliable source of trust and inspiration.
4. Include Them in Email Newsletters or Treatment Follow-Ups
Email might not feel as trendy as social media, but your patients still check their inboxes. Including before-and-after images in newsletters or follow-up messages is a smart way to showcase your work without relying on website visits or social platforms.
Ideas to include:
- A recent smile transformation case study with a short backstory
- A seasonal spotlight (e.g., whitening before wedding season)
- A gentle nudge in a treatment reminder email to reignite interest
These visuals become part of a nurturing strategy that keeps your care top of mind, without being pushy.
5. Train Your Team to Use Photos in Everyday Conversations
Your team plays a key role in helping patients feel comfortable about treatment decisions. Equipping them with before-and-after examples allows them to guide conversations naturally.
For example:
- Hygienists can casually show a few photos when patients ask about whitening or bonding.
- Treatment coordinators can reference similar cases when discussing costs or timelines.
- Front desk staff can point curious patients to the smile gallery during checkout.
Tip: Encourage authenticity. These shouldn’t be “sales pitches,” but honest examples that help patients make informed choices.
Final Thoughts: Let Your Work Speak for Itself
Before-and-after images are one of the most underused yet powerful tools in dental marketing. They help patients feel confident in your care and give them a clear vision of what’s possible.
When done thoughtfully, these photos don’t just show results; they build trust, support case acceptance, and help patients say “yes” to transforming their own smiles.
Need help creating a smile gallery or getting patient consent processes in place? Let’s chat. We’re here to help.
Comments